NekoCM Util - Printer

>> Wednesday, April 28, 2010

This is a little utility I'm working on. It's still under development. Basically is a simple way to print something using Java.
Normally to print something you will need to use the Print API, which is pretty annoying, so i googled and found this tutorial, it worked very good! For simple purposes is the easiest way by far.
I used it and by using it I realised I could make an API with the simple stuff I was doing, I planned on improving it later, and that would be some work because you would normally want to do that when using that tutorial source code, so I decided to do that, the result is very nice! It really helped me.
Right now the first NekoCM Util class is about printing, under the package com.blogspot.nekocm.util.print.
The idea behind that is basically make a print preview window, in the window there is a JPanel in which you draw what the page (Currently only A4 size) is gonna look like. And that's it! No worries about anything else, here is the example code.

PrintExample.java

import javax.swing.*;

import com.blogspot.nekocm.util.print.PreviewPrint;

import java.awt.*;
import java.awt.event.ActionEvent;
import java.awt.event.ActionListener;

public class PrintExample extends JFrame {
 public PrintExample() {
  super();
  this.setTitle("NekoCM - Print example");
  this.setSize(new Dimension(300, 200));
  this.setVisible(true);
  this.setLocationRelativeTo(null);
  this.setLayout(new FlowLayout());
  this.setDefaultCloseOperation(JFrame.EXIT_ON_CLOSE);

  JButton btn_print = new JButton("Print");
  btn_print.addActionListener(new ActionListener() {
   @Override
   public void actionPerformed(ActionEvent arg0) {
    new PreviewPrint(new PrintExamplePanel());
   }
  });
  this.getContentPane().add(btn_print);

 }

 public static void main(String[] args) {
  try {
   UIManager.setLookAndFeel(UIManager.getSystemLookAndFeelClassName());
  } catch (Exception e) {
   // best to do nothing here
  }
  new PrintExample();
 }
}

PrintExamplePanel.java

import java.awt.Color;
import java.awt.Font;
import java.awt.Graphics2D;

import com.blogspot.nekocm.util.print.PreviewPanel;

public class PrintExamplePanel extends PreviewPanel {

 public PrintExamplePanel() {
  super("A4");
 }

 @Override
 public void paint(Graphics2D g) {
  Graphics2D g2d = (Graphics2D) g;
  g2d.setColor(Color.WHITE);
  g2d.fillRect(0, 0, this.getWidth(), this.getHeight());
  g2d.setColor(Color.BLACK);
  g2d.setFont(new Font("Arial", Font.PLAIN, 20));
  this.writeAligned(20, "center", "Neko CM", g2d);
  g2d.setFont(new Font("Arial", Font.PLAIN, 11));
  this.writeAligned(-1, "left", "\nThis is an example\n"
    + "of NekoCM Print lib", g2d);
  this.writeAligned(-1, "right", "Enjoy~", g2d);
  this.writeAligned(-1, "center", "\n\nhttp://nekocm.blogspot.com", g2d);

 }

}

That will produce something like this


You can now download the Eclipse example project or just download the api.
Hope you find this useful! I will update this as soon as I improve it, although right now I'm more into BIP (which is also improving by the way ;))

Read more...

Generic Game

>> Saturday, April 24, 2010

BIP is 60% finished, and my first project with it, may be an overkill, aiming to improve it, (although it does not requires a tile map! which is what BIP is needing right now) I'll make a fighting game, but i want the game to be somehow like MUGEN, so you can customize the characters, each attack, animation, etc. I have interesting ideas, which I will post if i succeed with the first steps. Whish me luck!

Read more...

BIP - Managers

>> Thursday, April 22, 2010

I added a Sprite Manager and Audio Manager to BIP, now is very easy to load and play sounds. The Sprite Manager basically is a Vector with many sprites, so is easier to update and draw them all, is somewhat similar to DarkGDK way of managing sprites if you want to think it like that, you can check for collision doing something like this:

if(manager.pixelCollide(1, 5)) { /* Collision! */ }

That will check for collision between sprites 1 and 5.
Also I added a Button class inside the "gui" package, it's a very basic abstract class, the way you make buttons will be inherit from that class, and define your own actionPerformed method, then just call it with an image and a location, and optionally an image for the hover state.

BIP seems to be doing pretty nice so far, so I'm planning on using it in a small project now, which do not need tiled maps, to test it and improve it.

Read more...

CodeIgniter

>> Monday, March 29, 2010

CodeIgniter is a PHP framework, which is pretty fast and easy to learn.
Not many years ago I didnt really care much about frameworks, i had my little nice set of functions I collected during the years, and I didn't have much problems editting and creating new sites, but for some reason I decided to try frameworks.
I have always liked open source, so I really liked the idea of people sharing their awesome functionality, and if you dont have much experience with MVC starting with CodeIgniter is a great option! It takes like 30 minutes to read the begginer documentation, and then you have awesome reference, you may develop a bit slower first, but later you will do it faster! And in a very scalable way!
What is nice about using frameworks is that if it's a project where more than one person works (Including MVC advantages already) you know what to edit, you know what to do already, no need to lose time reading what other programmer structure is!
It has many many advantages, I will just say, i recommend it!
I have used for my last projects and it works flawlessly! I also like sharing my own libraries :) I made an excel plugin, to export an xls file.
Anyways! If you develop on PHP, i would say this is a very nice tool!

Read more...

Color Getter

>> Tuesday, March 23, 2010


About
This is a little program I made for my girlfriend (Alba ♥!) and i really liked helping her, also the program ended up very nicely, she had a very good idea!
The program is in spanish but you can make an idea easily :)

What is it about?
Well my girlfriend had a problem, she sometimes wanted to get the color of something on her screen, but it takes way too long to take a screenshot, open photoshop, zoom and then extract the color, so this program makes it easy! It's simplistic as i like my programs to be!

Here you can see the main window, you just click there to take a screenshot, a new window will open with the screenshot and more options!


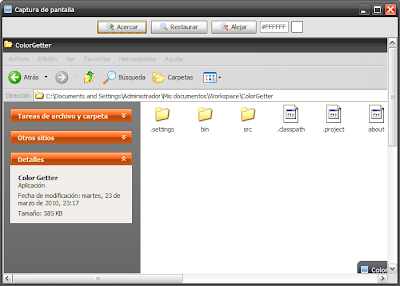
That is a screenshot of my desktop (Yes, i use Windows XP) just click anywhere to get the color, your cursor will change to a crossair, you have three buttons there also, you can zoom with those if its hard to get the color you want!
You can get my program clicking the following links:
Hope you find it useful! Special thanks to my girlfriend, Alba, for her great idea! ♥

Read more...

  © Blogger template Simple n' Sweet by Ourblogtemplates.com 2009

Back to TOP